Create a New Automation (Wizard)
This page walks you through the new-automation wizard end to end — the path from "I have an idea" to "the automation exists and I can edit it".
The wizard exists to handle the few decisions you have to make at creation time. The actual building (adding steps, configuring integrations) happens after the wizard, in the editor.
Before you start
Make sure that:
- You have at least one AI model connected to your workspace. Step 2 of the wizard needs one; Start Empty in step 1 does not. See Models → Create a New Model.
- You know roughly what the automation should do — the wizard does not ask for details, but the editor will.
- You have Editor, Manager, or Admin rights in the workspace. End users (role AgentUser) cannot create automations.
The wizard has two steps, and the line under the page title says which one you are on: Step 1 of 2.
Step 1 — Describe it
Open the Automations tab and click Create. The wizard opens on the first step, under the heading Description.
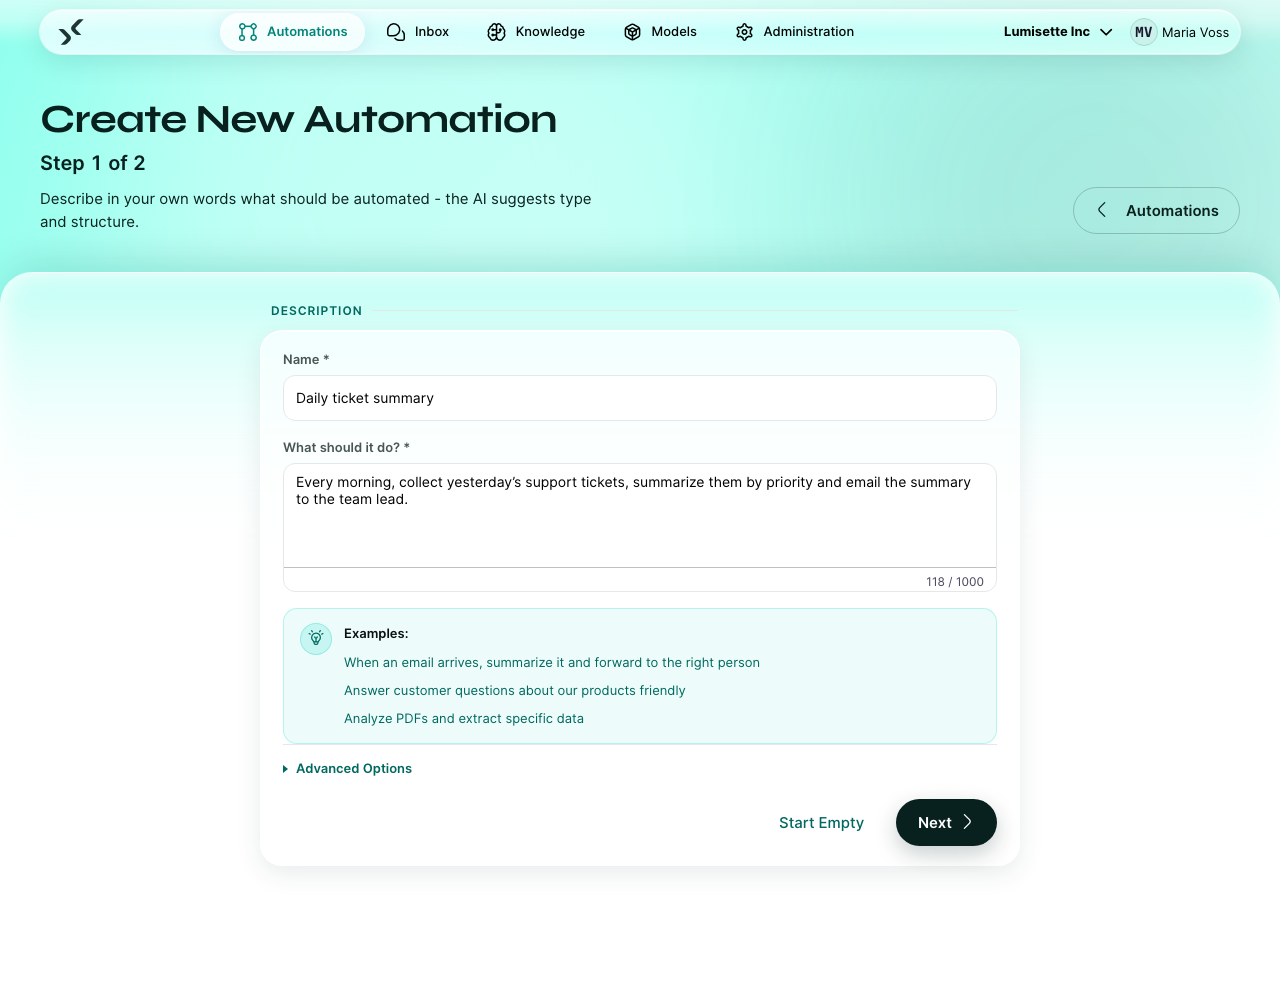
- Name — a short, memorable name. This becomes part of URLs and webhook addresses, so keep it descriptive but not too long.
- What should it do? — describe the job in your own words, in one or two sentences. This is what the assistant reads in step 2.
Both fields are required. Until both are filled, both buttons at the bottom stay disabled.
Under the description sits an Examples: box with three suggestions, such as "When an email arrives, summarize it and forward to the right person". They are clickable — a click writes the example into the description field, so you can adapt it instead of typing from scratch.
Advanced Options
Advanced Options is a collapsed section below the examples. Open it and it offers two things:
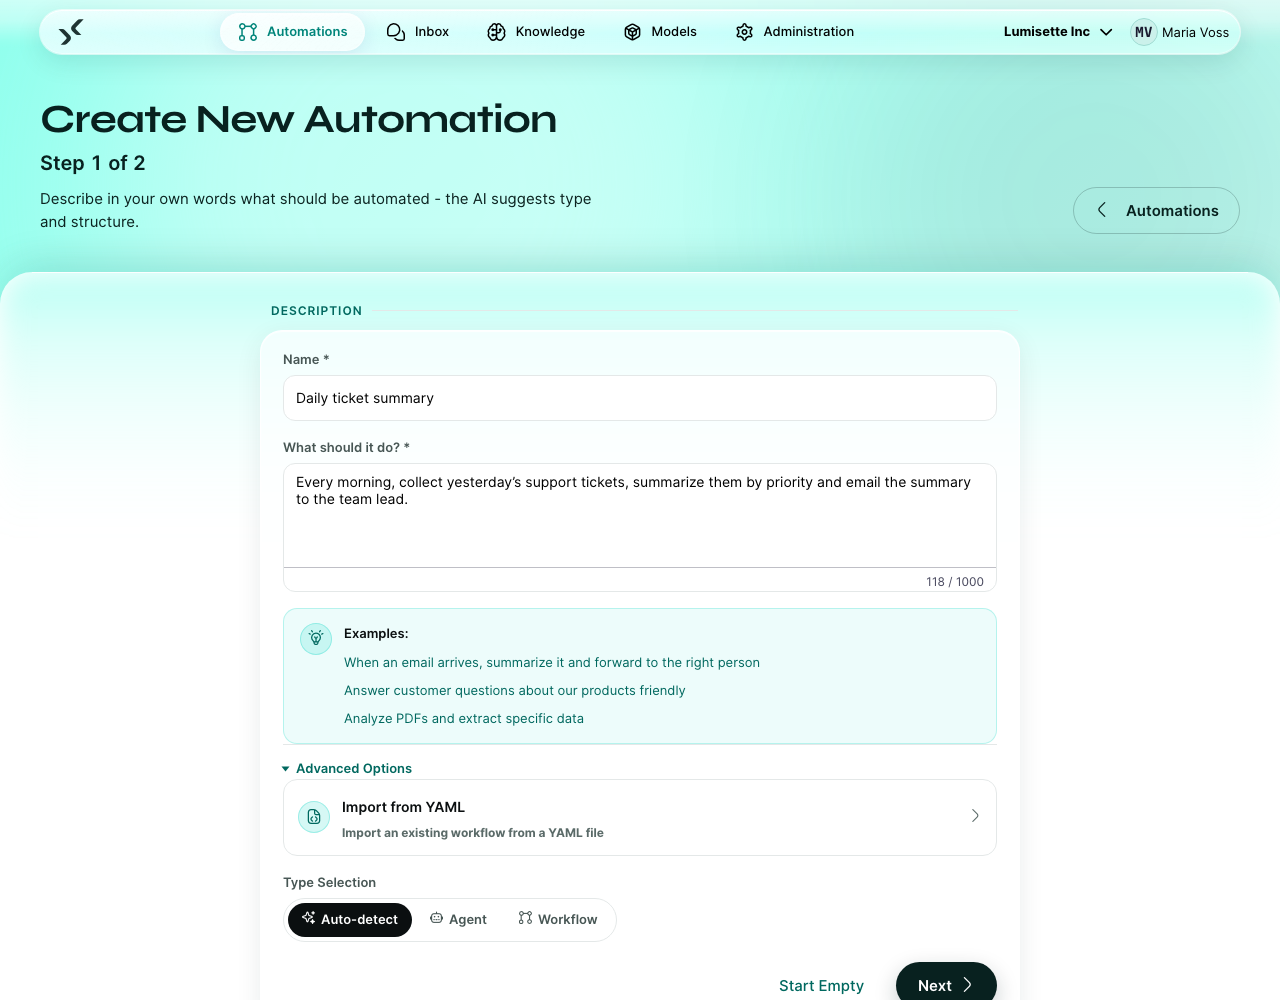
- Import from YAML — takes you to a separate step with a text area for a workflow definition (exported from another workspace, for example). Import Workflow stays disabled until there is content, and Previous brings you back to step 1. Importing skips the assistant entirely.
- Type Selection — three choices: Auto-detect (the default), Agent, or Workflow. Leave it on Auto-detect unless you already know what you want; the assistant in step 2 decides and explains its reasoning.
The two ways out of step 1
- Next — hands your description to the assistant, which analyzes it and takes you to step 2. This is the only part of the wizard that needs a working AI model.
- Start Empty — skips the assistant and creates a bare automation right away with just the name and description. You land in the editor with an empty structure. This is also the way to create an automation when no model is connected yet.
Cancel in the page toolbar returns to the Automations list without creating anything.
Step 2 — Review and choose a model
Step 2 shows what the assistant made of your description: Review the suggestion and choose the AI model to work with.
Recommendation
Under Recommendation, the assistant states its verdict — Agent recommended or Workflow recommended — together with the reason it came to that conclusion.
You are not bound by it. Change type: below the reason lets you pick Agent or Workflow yourself. (Auto-detect is not offered here; by this point the question is decided, one way or the other.)
- Workflow — for unattended, scheduled, or event-driven automations. The order of actions is predictable.
- Agent — for chat-based assistants. The user drives the conversation.
You can still change the type later from inside the editor, but it is rarely needed.
Select AI Model
Below the recommendation, the wizard lists every model connected to the workspace. Pick the one this automation should use by default. It is pre-filled on any step the editor creates for you, and you can switch it per step later.
If the workspace has no models, the wizard says so and offers a way to create one.
Create
Click Create Automation. The automation is saved and you land in the editor.
The automation is not active yet — triggers do not fire until you start them from the Trigger Monitor (see Administration → Trigger Monitor). This gives you time to build the whole thing in peace before it goes live.
What's next: the editor
The editor lets you:
- Add a trigger (a workflow can have more than one — see Integrations → Introduction).
- Add steps one after another and configure their inputs and outputs.
- For agents: define the persona (role, goal, communication style) and connect knowledge bases.
- Test the automation with Manual Run.
- See past Jobs and inspect what happened in each run.
- Export the definition as a YAML file for backup or sharing.
For workflow-specific editing, continue with Workflows. For agent-specific editing, see Agents.
Recommendations
- ✅ Use Manual Run as your testing tool while building — it bypasses the trigger and lets you simulate the input. You can iterate ten times in a row without waiting for tomorrow's cron.
- ✅ Pick a name that explains the purpose, not the technology. "Daily ticket summary" beats "GPT-4 cron job".
- ✅ Keep the automation's trigger stopped (in the Trigger Monitor) until Manual Run succeeds with realistic input.
- ⚠️ The name is part of the automation's URL. Renaming later changes the URL.
- ⚠️ If you import a YAML file, the import only checks the structure. The first Manual Run is where you find configuration issues (missing models, wrong knowledge IDs).
- ✅ Use Start Empty when you already know the structure, or when no model is connected yet — the assistant in step 2 needs one, the rest of the wizard does not.
- ❌ Don't pick a model you can't afford to run often. Switching the default model later is one click; switching after a workflow has been running for a week is harder.
What to do next
- Core Concepts — the moving parts inside an automation.
- Workflows or Agents — type-specific editing.
- Integrations → Introduction — the catalog of building blocks.
- Administration → Trigger Monitor — how to start the trigger once the automation is ready.